Hardware Target Settings
EZ LADDER® requires the selection and configuration of a hardware target prior to allowing placement of any objects in the ladder diagram. This selection is used to display only objects and functions that are supported by the target. These settings identify the operating parameters and limits of the hardware on which the completed ladder diagram will operate. This setting must match the actual hardware that the ladder diagram will be installed on.
To select a target. Use the Project menu and select Settings from the drop down menu. This will open the Project Settings Form window.
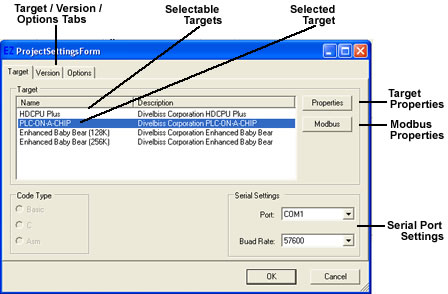
The Project Settings Form window is divided into three individual tabs, TARGET, VERSION, OPTIONS. Version and options will be discussed later. For now, we will focus on the target tab.
To select a hardware target, determine which hardware target you have and select it from the choices that appear. If your hardware target does not appear in the window, then contact Divelbiss technical support.
The PLC on a Chip target is to be used with the PLC on a Chip integrated circuit and module as well as the PLC on Chip Development Package. Other standard Divelbiss products will have their own specific targets (for example, Enhanced Baby Bear).
For the duration of this tutorial, we will use the PLC on a Chip target (for the Development Package).. If you must use a different target then you will need to adjust some parameters of the tutorial to operate with your hardware target (some features may not be supported by your hardware target).
To Select a Target:
Configuring Target Settings:
Once a target is selected, it must be configured before it can be used and accessed properly by the EZ LADDER® program. To configure the target:
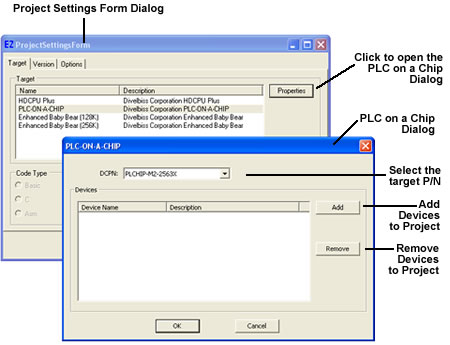
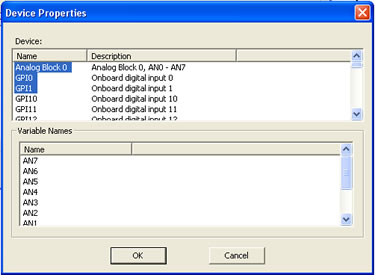
Click OK for the Device Properties dialog box and again for PLC on a Chip dialog. This will install the devices in the ladder diagram project.
Serial Port Settings:
Once a target is selected and configured, EZ LADDER® must be configured to communicate to it. To configure the Serial Port:
Click OK to close the Project Settings Form window and save the project target settings.
Code Type Settings:
The code type options are set when the target is selected and generally are not changable.